Archive
MEA10731 // sensor assignment // pitch detector
For this assignment we decided to make a pitch detector consisting of a microphone corresponding to a BlinkM LED, an ultra bright wide-angle RGB LED, via the LINKM USB smart LED controller.
BlinkM LED:

LinkM Controller:

We used Processing to communicate with the BlinkM LED and Max/MSP to detect the pitch. In order for both applications to communicate with each other we used an external library called ‘Maxlink’.

The pitch detector is set to detect 3 octaves, from C4-C6, following the major scale. For each note the LED outputs a different colour.

The colours are mapped to each note as listed below:

The video below illustrates how our prototype works.
Rene Olesen Laser Cutter Assignment
For the laser cutter assignment, I designed the sides of a six sided dice. As the image below shows, the dice is assembled with small hooks. By doing so, it was important to make sure that the space inside the hooks matched the thickness of the material.

I used an A4 sized 2mm plexi glass piece. After the laser cutting I assembled the six sides, as seen on this image:
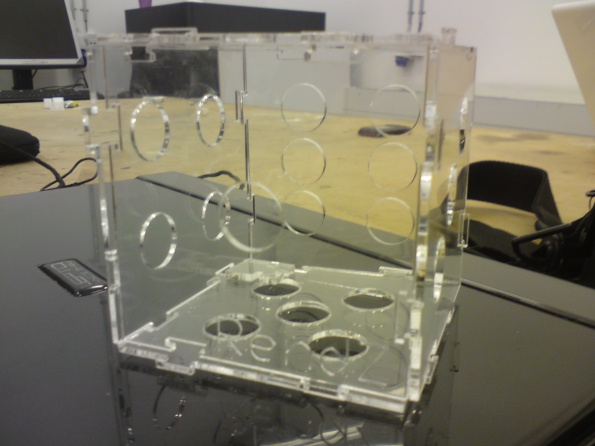
Note: Certain improvements could possibly be made to the design, as the assembly did not go quite as expected. When connecting two sides, the hooks does not align with each other, forcing one of the sides to be skewered a little, making the construction quite unstable. This could be prevented if the hooks were aligned differently.
Press fit construction kit (Khoa)
For my press fit construction kit I wanted to construct ‘potato head-like’ parts but which can be represented and combined in different ways, so it would be possible to create a random (imaginary) figure using every piece available.
I started out drawing a circle which can represent the surface of the sun but also a simple round head. Then I drew sun flares for the circle which can also be interpreted as spikes or claws. Other shapes then came along: human-like parts, banana shaped object, simple triangle and rectangle. All with the purpose of interpreting them as something different rather than just the shape itself.

The final sketches were drawn in Adobe Illustrator.

And then converted to an AutoCad format (I was told that previous experience with Illustrator gave problems for the lazercutting process once converted, but turned out to work fine for my case).
For the lazercutting material I used a 2mm thick A4-sized transparent plexi glass. In order to connect the objects I made 2mm thick notches with a length of 5-or 10mm on certain places on each object. In order to connect each part tightly I made the notches a bit skewed. That is, each notch on the outside is still 2mm thick while the inside is 1.90mm thick. This turned out to work well, so I kept this preference.

The lazercutting process went smooth and it succeeded in cutting all the parts out of the plexi glass on the first attempt. The result from the lazercutting is seen below, showing every shape available, separated.

Using my imagination I managed to create different figures, which is seen below.
The first two pictures show a sun figure where you see the shape of the sun from the front and by looking from the side you can see shapes of the sun flares held by two circles. The short and long sun flares are divided and connected to one of the two circles.


The next three pictures show an imaginary chariot. The circles are wheels with spikes sticking out, the banana shapes are the legs of a horse or some other animal and the triangle represents the rider wearing a viking helmet.


Last but not least, I managed to create a figure of what might look like a futuristic robot, with horns, wheel legs, a claw on each hand and wings on the back.


The Issue I have with the material is that it is easily breakable. A thicker plexi glass might be more robust to each shape. But nevertheless the final result turned out as planned.

MEA10731 // form&interaction assignment // Super Squeeze
For the video prototyping assignment, we ended up with the following 3 keywords:
Product: toothbrush
Target group: children (8-11)
Action: squeeze
We therefore wanted to come up with a product that would help motivating children to brush their teeth long enough (at least 120s).
There have been several approaches in that area, e.g. a musical tooth brush that plays tunes while in use:
In terms of the squeezing, there have also been some inspiring interaction design approaches such as a little device called “blobo”:
The goal was to make brushing teeth more entertaining, so we turned it into a game for the children! We chose super mario, a game known by everyone and fun for both girls and boys.
We had to redesign the common toothbrush into a game controller, making the end squeezable and equipping it with an accelerometer and blue tooth so it can be paired with a tv screen.

With mirror tv technology already developed, incorporating the tv screen into the bathroom can be done very elegantly.
http://www.trendir.com/archives/001454.html
The game:
In 120s, collect as many points as possible.
The faster you brush, the faster Mario runs.
Jump by squeezing the toothbrush end.
Find the golden toothpaste token to load up your tooth paste power. Once you loaded your tooth paste power, you can shoot at your opponents the next time you squeeze the toothbrush. Also, real toothpaste will be automatically dispensed by the toothpbrushhead.
For our movie, we sketched a rough storyboard:

Sit back and enjoy-we’d like to present to you… SUPER SQUEEZE!
CDPT6 Form/interaction assignment (10732)
The following random keywords were drawn from a pool of keywords:
Product: TV
Target group: Elderly people
Action: Hand movement recognition
We decided that we want to make life easier for elderly (and lazy) people by using gestural control of TVs instead of having to use a remote. The system consists of a camera which is connected to a TV through a box. Here’s a sketch of the environment:

Our goal was to create simple gestures that anyone will find natural and easy to understand. Furthermore, we aimed for one-hand gestures to make the system less complicated.
We came up with the following 6 hand movements for controlling a TV:
1) Hold an open hand in front of the TV: Turns the TV on

2) Hold a closed hand in front of the TV: Turns the TV off

3) Wave you palm upwards: Volume up

4) Wave you palm downwards: Volume down

5) Wave your palm to the right: Next channel

6) Wave your palm to the left: Previous channel

7) Close your palm: Mute the TV

8) Open your palm: Unmute the TV

Here’s a video showing the result of our Wizard Of Oz prototyping: http://www.youtube.com/watch?v=ybXjRF4A4qU
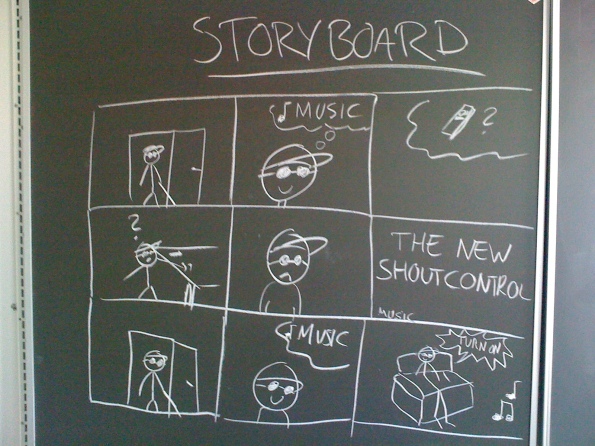
mea10730 Rene Olesen and Casper Slynge Interaction video assignment
For this assignment, we randomly picked these three subjects:
Product: Remote control
Target group: Visually impaired people
Action: Shouting
After some brainstorming, we ended up with the idea, of creating a voice-controlled music player, obviating the need for a remote control. This is a technology that especially visually impaired people would appreciate. The so called Shout Control.
For the concept video, we created the following storyboard:
And the final video can be seen here:
Press Fit Construction Kit // Musical Notes
For the Laser Cutter assignment, I thought of our semester project, the “Musikarium”, and therefore wanted to do something related to music. To visually construct music, one typically uses musical notes:

As one can see, with only 3 elements already most of the standard musical notes can be constructed:
- ellipse (for the note head)
- straight line (for the stem as well as connecting bars)
- curved line (for single quavers and semiquavers)
So in order to make a kit, those are the different elements that are needed. Furthermore, the heads would only require one notch each to be connected, whereas the straight line elements should be used in more than one way and therefore needed a lot more notches. The curves were a bit tricky as well, since I wanted to to make semiquavers so one would have to be able to add up to 2 curves to each note. I made some rough sketches of how all the parts could be constructed.

Afterwards, I used Illustrator CS3 to make the final sketches that could then be imported into AutoCad.


The final cutting process involved several stages. I had originally chosen a 6mm thick flake board as my cutting material, but the laser burned the edges and the board turned out to be too thick as the laser couldn’t cut through properly even after several runs.


I then used 2 acrylic sheets (3mm) instead, a clear (for the stems) and a red one (for heads and curves).
In order to make the notches the right size, I first cut out a few test pieces which are marked in red (see above). The best fitting solution was a notch that was 3mm on the outside and 2.9mm on the inside, allowing them to connect tightly enough.

This results in the following final musical notes:

The stem elements turned out to be a very nice construction kit of their own, as they can be combined in various other ways and e.g. form entire shelving units:

Individual Assignment: 2D press-fit construction kits [Pen Holder]
For this assignment, I have chosen to design a pen holder and make use of plexiglass (0.5 mm) as the main materiale. I began the process by sketching some different pen holder models:

After this I picked out the model I liked best (nr.4) and started to design the individual parts (including the measurements) for the chosen model:

Now that I have designed the individual parts of the pen holder. I decided to make a prototype of it, in order to get a better feeling of the overall design and to see if the measurements of the individual parts were appropriated as well:
 After some adjustments in the measurements of the individuals parts. I draw this project in Adobe Illustrator CS 5 and exported it to AutoCAD:


Finally the pen holder was ready to be cut out with help from the lasercutter and the right settings in AutoCAD. Here is the final result:

Press-fit construction kit
My initial idea was to create one piece from which it should be possible to create any figure/shape. I was thinking about using bendable materials, but I quickly realized that this would be a tricky task. Some initial brainstorming was done:


My next idea was to create a single piece for creating cubes and rectangular boxes. I created and design for the pieces, but when they had been cut out I realized that the pieces did not fit together as well as I thought when I did paper prototypes. Pictures of the paper prodotype, the old pieces and a screenshot from AutoCAD can be seen below:
")

I discarded the idea of having only one piece and tried to do a design for a simple cube. This cube has two kinds of pieces, see the pictures below:


When laser cutting the ”regular” cube, Mads (9th semester) and I came up with the idea of cutting holes in the pieces and do ”press-fit dices”. Pictures of the pieces and a dice are shown below:


Lastly, here is a comparison of the different pieces, showing the evolution from the initial to the final design:

