Archive
mea10730 Rene Olesen and Casper Slynge Mini Project
Our mini project is based on an observed problem that various media campaigns have tried to reduce for years. The so called “right turn”-accidents, a scenario where a heavy vehicle (such as a truck) needs to make a right turn in an intersection, and hits a cyclist or a pedestrian who is heading straight forward. This is due to blind angles, and although these heavy vehicles are equipped with several mirrors, these accidents still occur.
Notifying the truck driver about these vulnerable road users is crucial, but at the same time, the notification should not be too disrupting, as the driver needs to keep his focus on maneuvering the vehicle. So if a system could be installed, that automatically warns the driver with a discrete alert, it could raise the awareness of the driver without interrupting his driving.
We have used Bill Verplank’s framework for interaction design to sketch out the concept:

By detecting the surrounding cyclists with proximity sensors, the system should send out vibrations to a corresponding area of the truck driver’s seat. For the implementation of the prototype, we used the CUI32 board to connect four proximity sensors to four cell phone vibrators, by mapping their i/o ports in the CUI software.


Our code looks as follows:
10 dim prox1 as pin an0 for analog input

11 dim prox2 as pin an1 for analog input

12 dim prox3 as pin an2 for analog input

13 dim prox4 as pin an3 for analog input

20 dim vibe1 as pin rd1 for digital output open_drain

21 dim vibe2 as pin rd2 for digital output open_drain

22 dim vibe3 as pin rd3 for digital output open_drain

23 dim vibe4 as pin rd4 for digital output open_drain

30 dim threshold

40 let vibe1 = 0, vibe2 = 0, vibe3 = 0, vibe4 = 0, threshold = 1100

50 while 1 do

60   print prox1, prox2, prox3, prox4, vibe1, vibe2, vibe3, vibe4

100 	if prox1 > threshold then

110    	let vibe1 = 1

120 	endif

130   if prox1 < threshold then

140    	let vibe1 = 0

150   endif

200  	if prox2 > threshold then

210    	let vibe2 = 1

220   endif

230   if prox2 < threshold then

240    	let vibe2 = 0

250   endif

300   if prox3 > threshold then

310    	let vibe3 = 1

320   endif

330   if prox3 < threshold then

340    	let vibe3 = 0

350   endif

400   if prox4 > threshold then

410    	let vibe4 = 1

420   endif

430   if prox4 < threshold then

440    	let vibe4 = 0

450   endif

460   sleep 100 ms

470 endwhile
To heighten the authencity of the prototype, we acquired a toy truck and mounted the proximity sensors on it. The following video demostrates the prototype in action. It can be difficult to see the vibrators moving, but it does work as intended.
Note: For the poster created for this concept, please check out our previous blog post.
– Casper & Rene
Thermometer assignment – Casper & Rene
Hi again guys ! 😉
We have just finished implementing our thermometer code and thought we wanted to share it with you.
As the assignment required, we connected the TMP102 to the CUI along with an LED-strip and a speaker:

On a PC we downloaded the tera-term software and installed the StickOS drivers for windows.
The concept we have implemented is applicable when being on a ski vacation. The CUI is programmed to alert with a red light on the LED-strip and a tone of approx 100hz when the temperature gets below -15 celcius. When it is between -15 and -5 the LED-strip turns yellow and low vibrating tone is emitted from the speaker. Above -5 celcius, there is no alert, so the LED-strip turns green, and the speaker doesn’t make a sound.
Below is a video of how the final implementation works:
And the actual StickOS code:
 10 dim i, j

20 dim cmd as byte, rsp[2] as byte

30 dim temp

40 dim freq

50 dim audio as pin rd1 for frequency output

60 dim leds[20] as byte

70 dim latch as pin rg9 for digital output open_drain

80 dim sync as pin rg6 for digital output open_drain

90 let latch = 0, sync = 0, audio = 0

100 while 1 do

110   print temp

120   if temp<=25 then

130     let audio = temp*4

140     for i = 0 to leds#-1

150       let leds[i] = 0x80+0x4

160     next

170   endif

175 if temp>25 && temp <=28 then

180     let audio = temp*1

190     for i = 0 to leds#-1

200       let leds[i] = 0x80+0x5

210     next

220 endif

225 if temp >28 then

230 	let audio = 0

240     for i = 0 to leds#-1

250       let leds[i] = 0x80+0x3

260     next

270   endif

280   qspi leds

290   let latch = 1, latch = 0

300   let cmd = 0

310   i2c start 0x48

320   i2c write cmd

330   i2c read rsp

340   let temp = rsp[0]

350   i2c stop

360 endwhile
Note that the temperature intervals has been changed, in order to be able to demonstrate and show the functionality of the concept.
Laser Cutter assignment: Casper Slynge
For my laser cutter assignment I came up with a concept of developing a new type of lego. Instead of lego always before very “square” and “rough”, I thought about how you could make a construction kit that would emit more flow and softness. So I came up with organic lego: Slego (Slynge’s lego 😉
Here’s a blackboard sketch of the concept and design of Slego:

Initially I thought about making my construction kit shaped like cylinders. Below is a picture of my initial design and as you can see, the slego bricks are made in “three dimensions”:

However, when choosing my material for the construction set, I chose to start of with a 3 mm plexiglass, limiting my opportunities of making all intended bricks. I removed those that weren’t possible to make in the laser cutter giving the material I bought and ended with these pieces for my Slego set:

Pictures of my final laser cutted pieces will be uploaded soon.
mea10730 Rene Olesen and Casper Slynge Poster (3D input devices and tactile feedback) assignment
This is our finished poster. It is presenting a concept that makes use of tactile feedback to prevent traffic accidents. Should be quite self-explanatory:

– Casper and Rene, group 730
mea10730 Rene Olesen and Casper Slynge Interaction Design Framework assignment
With inspiration from the vast amount of post-it notes/flashcards, we have come up with a concept that improves certain aspects of furniture handling. By using Bill Verplank’s interaction design framework (https://ccrma.stanford.edu/wiki/Interaction_Design_Framework) the various aspects of the concept are clarified.

If some of the writings of these sketches aren’t readable, this is what they say:
Stackable Furniture:
– Idea – Make use of the third dimension
– Metaphor – Building blocks
– Model – Reduce transport time – Predefined assembly
– Display – Recognizable patterns to make it easy to assemble
– Error – Difficult to transport, move and/or store furniture
– Scenario – – John has bought a new apartment – he finds it difficult to transport efficiently
– Task – Cases A and B – 1A Disassemble, 2A Use as regular furniture – 1B Assemble, 2B Transport easily
– Control – 1. Assemble, 2. Transport by sack trolley
The next step was to create a prototype of the concept. For this, we decided to create a model that could be printed by a 3d printer. This was done by using 3d Studio Max. These images show an example of a potential stackable furniture collection:


At the time of writing, the models haven’t yet been printed, but this post will be updated when this happens.
– Casper and Rene, mea10730
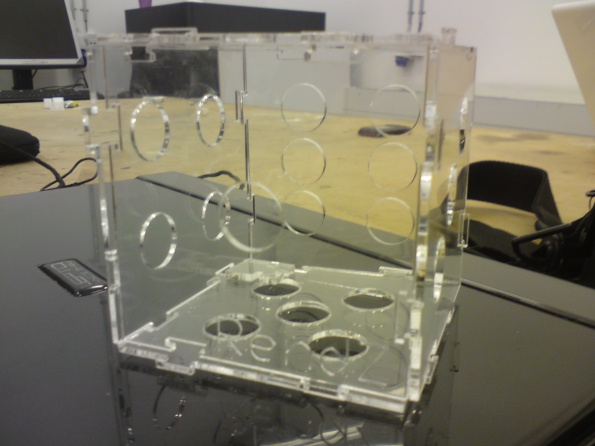
Rene Olesen Laser Cutter Assignment
For the laser cutter assignment, I designed the sides of a six sided dice. As the image below shows, the dice is assembled with small hooks. By doing so, it was important to make sure that the space inside the hooks matched the thickness of the material.

I used an A4 sized 2mm plexi glass piece. After the laser cutting I assembled the six sides, as seen on this image:
Note: Certain improvements could possibly be made to the design, as the assembly did not go quite as expected. When connecting two sides, the hooks does not align with each other, forcing one of the sides to be skewered a little, making the construction quite unstable. This could be prevented if the hooks were aligned differently.
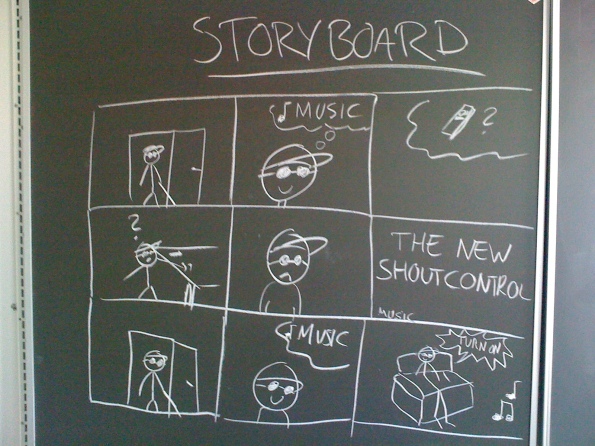
mea10730 Rene Olesen and Casper Slynge Interaction video assignment
For this assignment, we randomly picked these three subjects:
Product: Remote control
Target group: Visually impaired people
Action: Shouting
After some brainstorming, we ended up with the idea, of creating a voice-controlled music player, obviating the need for a remote control. This is a technology that especially visually impaired people would appreciate. The so called Shout Control.
For the concept video, we created the following storyboard:
And the final video can be seen here:
mea10730 Rene Olesen and Casper Slynge Sensor assignment
For our sensor assignment, we have chosen to create a dynamically controlled light show (e.g. for sport events). The light is controlled by the audio frequencies in the surrounding environment, displaying different colours, based on the average pitch level.
The purpose of doing this is to heighten the experience of going to a sport event, by involving the spectators actively.
We began by sketching the concept, which can be seen in the following images:


This video shows a primitive but functional prototype. As seen in the video, different auditive gestures (clap, whistle, cheering) will affect the LED and thereby display various colors:
And this animation visualizes the concept in use:
If this concept were to be implemented one could imagine a series of options, e.g. competition inbetween the spectators to support their team the best.
Cheers,
Rene Olesen and Casper Slynge
